Источник: Sarah`s Hand Embroidery Tutorials
straight stitch family 

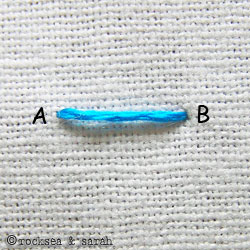
Straight stitch
This is the most basic of the stitches. To know how to bring the needle in and out through the fabric is perhaps the most essential necessities of learning how to stitch. This tutorial will teach any novice how to do this. Straight stitch can be used in a variety of ways to create different effects.
 |
 |
|
| Fig 1: Bring the needle out from the fabric, at a pint A. |
Fig 2: Put the needle in through a point B, as shown. This creates a single straight stitch. |
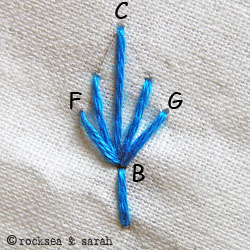
This stitch is made of series of three straight stitches. It resembles a fern leaf and so, a good stitch to do vegetational designs.
You need to know how to do the straight stitch. I will work over three parallel curved stitch lines to bring out the effect.
 |
 |
|
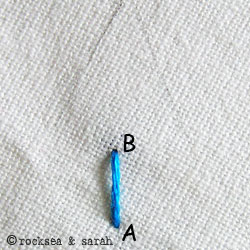
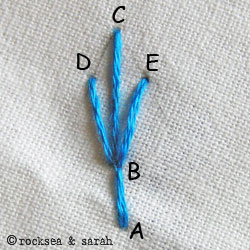
| Fig 1: Bring the needle out from A and take it in through B, both points which lie over the second stitch line. | Fig 2: Now, Take the needle out through C, a point which lies on the first stitch line.This point lies a little higher than the point B (about 45 degrees). | |
 |
 |
|
| Fig 3: Now, take the needle in through the point B. Then, bring the needle out through point D, and take it in through B. This finishes a set of three straight stitches. |
Fig 4: Bring out through E and back in to B. Follow the illustration to continue. | |
 Fig 5: A finished portion looks like this. |
This stitch combines atleast eight straight stitches to form a star like pattern inside a square area. The Algerian eye stitch can be used as a filling stitch on even weave fabric in a wonderful way.
You need to know the straight stitch to be able to do this pattern. I will work within a roughly made square area to illustrate this stitch.
 |
 |
|
| Fig 1: Bring the needle out from A, a corner of the square. Take the needle in through B, the middle of the square. Again, bring the needle out from C, a point that lies half way of one of sides fo the square, as shown. | Fig 2: Now, continue the sequence of bringing the needle out through the corners and then through the middle of the sides, each time, taking it inside B. Work this all around the square. | |
 |
Fig 3: The algerian eye stitch would look like this. You may add more spokes or straight stitches, but in even numbers, to get a more filled algerian eye. The minimum spokes you would want is eight, as shown here. | |
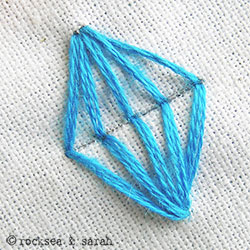
The diamond eyelet stitch is technically worked like the algerian eye stitch. Only, it works around a diamond outline, and carries more spokes (straight stitches) for a filled effect. Again, this can be used wonderfully over even weave cloth to create great textured fillings.
I will be working within a diamond shaped area to illustrate this stitch. This illustration shows working the straight stitches from the outside to the centre. You can work the straight stitches from the centre too.
 |
 |
|
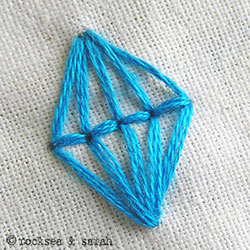
| Fig 1: Start by bringing up the needle from a corner of the diamond shape, point A. Take the needle in through the centre, that is, point B. Then, bring the needle out from C and again in through B, as shown. | Fig 2: Keep up with this procedure to fill the entire diamond shape. Keep the number of straight stitches even, atleast twelve. | |
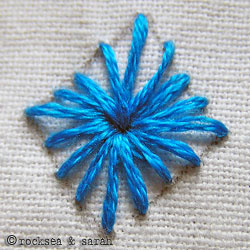 |
Fig 3: A finished diamond eyelet looks like this. |
This tutorial is an illustration, of many,on how a few straight stitches can be combined to form patterns to use for embroidery.
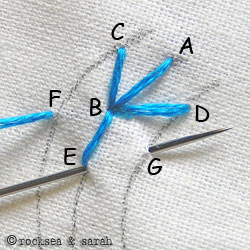
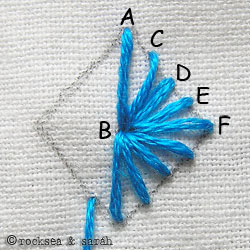
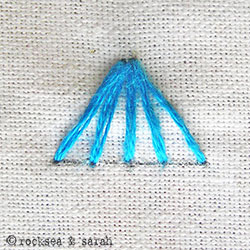
This stitch uses eight straight stitches to form a fan like pattern.
 |
 |
|
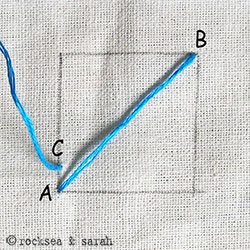
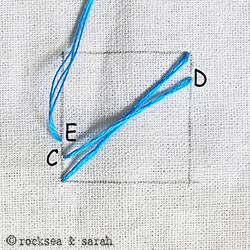
| Fig 1: Begin by making the leg of the 'fan', by doing a straight stitch A-B. | Fig 2: Now, make the sitches C-B, D-B, E-B, as shown. | |
 |
 |
|
| Fig 3: Continue making these straight stitches in a slanting manner with B as the centre point. The ray or fan effect begins to take shape. | Fig 4: A completed ray stitch would look like this. |
Radiating stitch
This is a very simple stitch. As the name goes, the stitch radiates from one corner and beams out in different rays. Radiating stitch is decorative and can be used very flexibly.
 |
Fig 1: Bring out the needle from O and take the needle in through A. Bring the needle out through O again and in through B. Keep up with this procedure for as many rays as you want. |
Lantern stitch
This stitch is just an extension of the radiating stitch. You can say it is like mirror images of the radiating stitches, made to look like a lantern. The Lantern stitch can be used to make simple motifs or base for extended variations. It can be used nicely over even weaved fabric as well.
You need to know the radiating stitch to be able to continue with this tutorial.
 |
 |
|
| Fig 1: Start by making radiating stitch | Fig 2: Then, make a mirror image of the radiating stitch, as shown. | |
 |
 |
|
| Fig 3: Now, bring the needle out through B, in through A, and out through C. This process will start connecting both the radiating stitches, giving it a lantern look. Connect the remaining points. | Fig 4: A finished lantern stitch looks like this. |
This is an easy to do stitch that can add texture and interest to your fabric.
I will work around a circle divided into many equal parts to resemble a cart wheel. The stitch points will fall on the outer circle and the center.
 |
 |
|
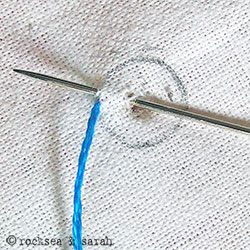
| Fig 1: Start by bringing the needle out from A and in through B, two points on the outer circle. | Fig 2: Now, bring the needle out again through A. Then, take the needle in through C, the center. Come out through D, as shown. | |
 |
 |
|
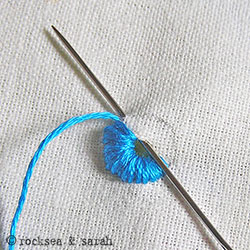
| Fig 3: Now, repeat the procedure as in the first step. | Fig 4: Continue with this process for the rest of the circle. | |
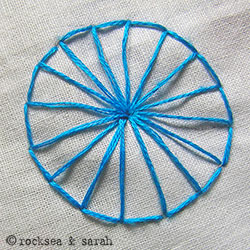 |
Fig 5: A finished wheel looks like this. |
This stitch resembles a small eye on a doll. Eyelet stitch is particularly nice when done in the same color as the fabric, like white on white. This stitch helps to create a small hole in the fabric with a work around it. You can work with this technique, no matter how big the hole.
 |
 |
|
| Fig 1: To begin with, puncture a hole in fabric. I used a nail to do that. Now, draw a stitch line around it. The area between the drawn line and the hole will be filled with stitches. Bring out the needle from one end of the stitch line as shown. Take the needle in through the hole and bring it out again from the stitch line, as near as possible to the previous point. |
Fig 2: Keep up with this simple procedure. Work all around the hole. To make the hole more visible, just pull the thread out tighter.
Instead of a circled stitch line around the hole, you can also experiment with any other shapes, like square or an oval. |
|
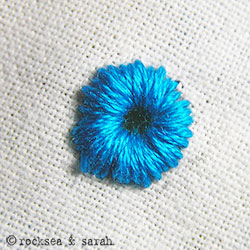 |
Fig 3: A finished eyelet stitch looks like this. |
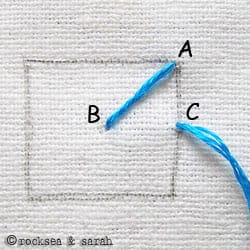
This is a very interesting stitch that leaves scope for some experimentation. A series of straight stitches are used to overlap each other to develop a symmetric shape like square, circle, heart, etc… This stitch can be worked nicely over even weaved fabric, but this tutorial will illustrate it over normal fabric. Rhodes stitch can make great filling textures.
I will demonstrate a square shape using this stitch. So, I will work inside a square drawn on the fabric. The outline of the square will be the stitch line for the rhodes stitch.
 |
 |
|
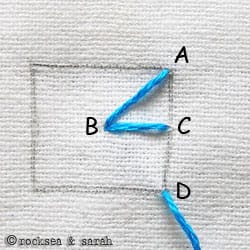
| Fig 1: Start by coming out from one corner of the square shape, the point A. Take the needle in at the opposite end, point B. | Fig 2: Now, come out from C, a point near point A. Go in through D, a point opposite to C. Then, again come out through E, and continue with this process. | |
 |
Fig 3: A finished square looks like this. Since the straight stitches run from one end to the other, overlapping each other at the center, it gives a 'spinning' appearance. This technique can be used to make any shape, especially symmetric ones. So, try circle, triangle, and heart shapes too. |
This stitch can be easily done to make a variety of effects. As the name suggests, two straight stitches are connected to form an arrow shape. A series of such arrows can create nice looking borders or can be creatively used in pattern designing. These arrows can be used horizontally to form easy zig zag patterns too. It can also take on curves pretty well.
You need to know the straight stitch to be able to continue. This stitch will be illustrated between 3 parallel curved stitch lines- A, B, C.
| Fig 1: Start by bringing out the needle through a point in A. Take the needle at an angle through a point in B. | Fig 2: Now, bring the needle out through a point in C and back to the point in B. This makes an arrow. Continue this process in a vertical manner. | |
| Fig 3: A row of arrow head stitch looks like this. | ||
| Fig 4: Arrow head stitch can also be made horizontally. Stitch A-B, C- B. Then, stitch C-D, E-D. And so on… |
This is a decorative version of the arrow head stitch. Again, it can be used to creative beautiful out linings or borders.
You need to know the arrow head stitch to be able to continue with this tutorial.
| Fig 1: Make a horizontal row of arrow head stitches. | Fig 2: Now, bring the needle out with a contrasting thread, from one end, as shown. Pass it under the two arrow head stitches as in the picture. | |
| Fig 3: Turn around and pass it under the two arrow head stitches and the next stitch, as illustrated. | Fig 4: Repeat the process for the rest of the row. | |
| Fig 5: A finished row looks like this. Each angle of the arrow head stitch would be circled by the contrasting thread that was woven around it. |
This stitch is just a chaos of single straight stitches used to fill patterns. Unlike theseed stitch, it does not follow any straight line or pattern, rather its speciality lies in it not having a pattern. It looks like strewn rice grains over the ground, which contributed to its name.
I will work on a paisley pattern to demonstrate this stitch.

Make a single straight stitch at any angle, preferably from one end of the pattern. Keep making such single stitches randomly at different angles till the entire pattern is filled. A finished sample would look like the pattern above.